
As the latest Minecraft update named the Trails & Tales update released, a lot of players are starting new servers to explore the newly added features. But starting a new world also means gathering basic resources all over again, such as food, iron, and wood. But repeatedly mining for resources for hours at a time can be very tiring and downright boring.
That is where automatization comes in. Just like in real life, we Minecraft players try to automatize the tasks we don’t want to keep doing over and over again. Mining iron is definitely one of those tasks, as it is one of the most used materials in the game.
The most efficient way to collect iron in Minecraft is not by strip mining for days, where you hope to find enough iron for your armor set. The most efficient way of collecting tons of iron in Minecraft is by making a fully automatized iron farm. You don’t even need any Redstone to make this iron farm!
Iron Farm Mechanics
The iron farm abuses some of the Minecraft villager mechanics that are in the game, to produce iron ingots and poppies. It usually acts as a player-constructed mini village, where iron golems are spawned and then killed.
When you have 3 villagers, who all have their own beds, it technically counts as a village. That will begin iron golem spawning. They must spawn in the right area though, so during the construction of the farm I kept that in mind. You can boost your farm with a single zombie. If the villagers see a zombie, they begin to panic, and the golem spawn rate gets increased. All there is left to do is to make sure the golems are led to the loot collection where they are killed.
Step 1
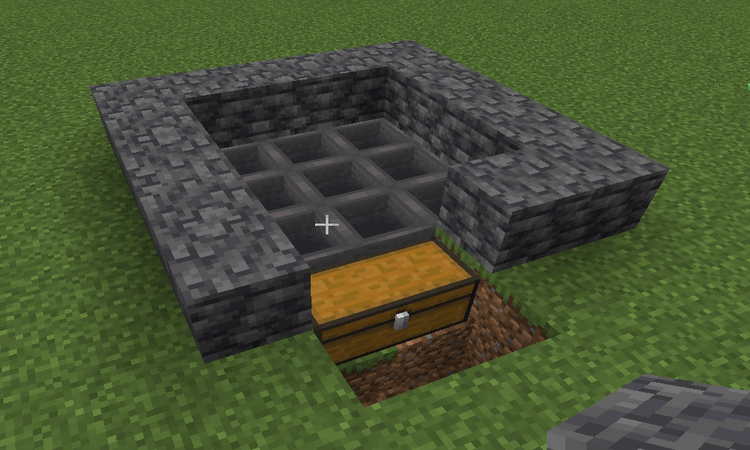
To start, make a 3×3 hole in the ground that is 1 block deep, then fill it up with hoppers. On one side place a double chest, as you can see in the image above. Make sure the hoppers are connected to each other and later to the chest. Surround the hoopers with the building blocks of your choice just like in the image above.
Step 2

Increase the surrounding wall to a height of 3 blocks and make sure you leave at least a one-block-high opening above the chest. If you don’t, the chest won’t open. On the second line of blocks place three rows of signs. These are crucial, as they will keep the lava from flowing down and destroying your loot.
Step 3
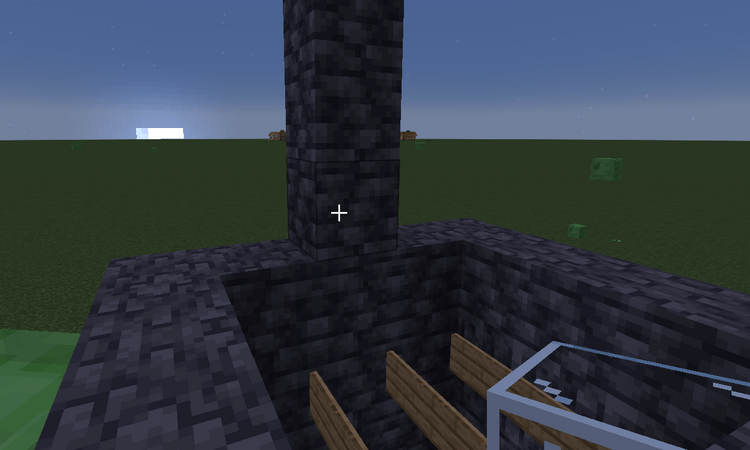
On the side where you don’t have your chest, start building a pillar that is 25 blocks high, on a position that is seen in the image above. At the top of the pillar, build the formation of blocks that is seen in the image below.

The 3 block formations will be where you will have your villagers, and the one single block in the middle is where you will have your zombie. I usually make the full build first, then use the railroad to get the villagers and the zombie up there, but you can choose to do so now too if you wish.
Step 4

Put the beds on the blocks as you can see in the image above and surround them with glass. Make sure there is a one-block opening between the villager and the zombie. Mobs in the game are coded so they can not see through blocks, even if they are transparent. If your villager does not have a direct line of sight to the zombie, your farm won’t work.
Step 5

Cover the whole layout with a layer of building blocks of your choice. Mine was about the size 10×10 blocks and 2 blocks high, but you can also make it a bit smaller. Also, make sure one corner of your platform is directly above the hoppers you laid out at the start. Now is also the time to add the other 3 pillars around your hoper area, just to make sure your iron golems don’t miss the landing zone when they fall.
Step 6

Right above the hopper area, make a 3×3 hole in your platform and fill it with signs. That is just to make sure the water doesn’t accidentally fall and take out your lava.
Step 7

This is how the platform should look from the above. I surrounded it with walls to make sure any golems don’t jump out of it. I also made sure it is properly lit up, so hostile mobs don’t spawn up there and fill our chest with unwanted loot. Will the corners with water, so it pushes the golems towards the opening.
Step 8

Now it’s time to get the mobs in their places. Remember, the zombie goes in the middle, and the villagers around it. Now this is very important, you MUST name your zombie, if not it will despawn. You can do so with a simple name tag. You can play around with the railroad and minecarts to get the mobs in their place but do not lose your patience. This is the most frustrating part but also is the final step before you get to collect infinite iron!
Step 9
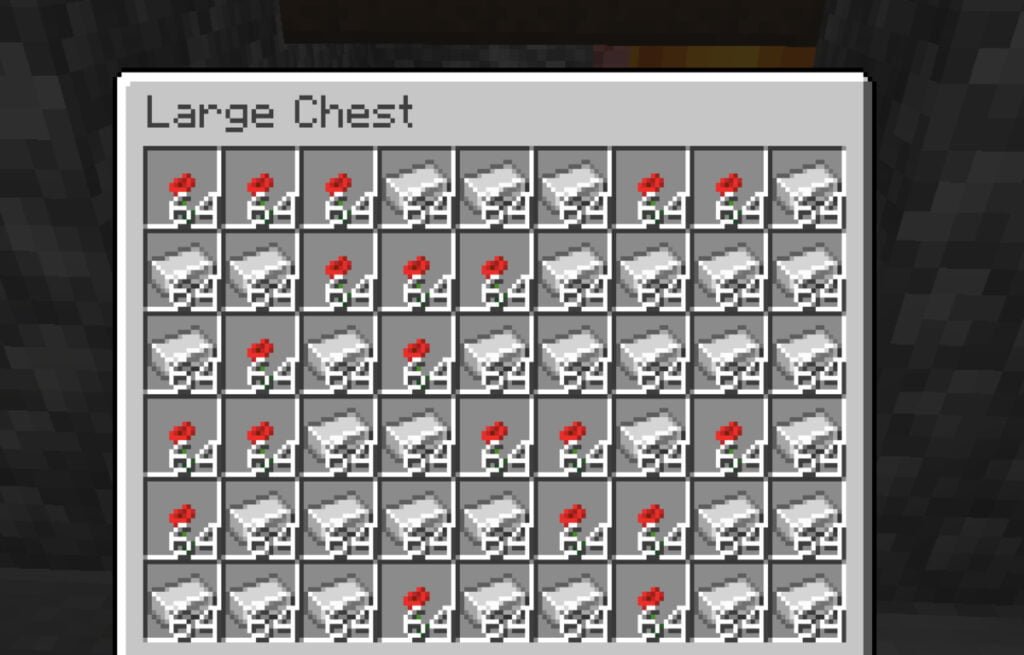
All there is left to do is put the lava above the signs at the bottom and your iron farm is complete! Iron golems should spawn in the platform above, where the water pushes them to a lava free-fall. Lava kills the golems, and the loot (iron ingots and roses) gets collected in the chest that you placed!
Extra tip: Make the farm close to your spawn area. If you move far enough from one piece of land in Minecraft, it will not be loaded anymore and any machinery you set up on it won’t work. The exception to that is the area you spawned in. It is always loaded for you in case you die and have to respawn. If you make your iron farm in that starting area it will always be loaded and will always be producing iron, no matter where you are.


Matchless topic, it is interesting to me))))
Has casually found today this forum and it was registered to participate in discussion of this question.
You are not right. Let’s discuss it. Write to me in PM, we will communicate.